
MINKY ROUND IS NOW LIVE FOR SALE! Click here to purchase.
*Written by: Danielle from Homesewn Couture
In this house, we can never have too many blankets! I was sent a FH of this vibrant dinosaur minky along with some black and white squiggly minky to sew up for RockerBye Destash Fabrics. I picked up my mail before the post office opened so I could get my hands on it right away! I even hand washed it, because who has to to wait for a washing machine…
If you know me, you know that I can’t just do simple. I always need to add something extra, even if it’s a small something. So, I decided to add a dinosaur skull applique to my new little blanket, and I’m so glad I did. It gave it a little something extra, without taking away from the beautiful artwork of the fabric!
To start, I drew out my dinosaur skull on paper and cut it out. I than used some double sided interface webbing. I ironed the webbing to the wrong side of the fabric that I was using for my dinosaur skull. Once the webbing was ironed onto my fabric, I traced my applique onto the WRONG side of my fabric, right on top of the paper backing of the webbing.


After my applique was traced onto my fabric, I cut it out by hand. Key for this, SHARP scissors! Now that my white dinosaur skull has been cut out, I layed it onto a black piece of fabric and traced out a silhouette that was just slightly larger than my original applique. I had already placed my interface webbing on my black fabric at this point. Cut out your second applique. Remove that paper backing from the first applique and place it onto your silhouette. Only remove the paper backing from the top applique, NOT the bottom. Iron on your top applique to the bottom.
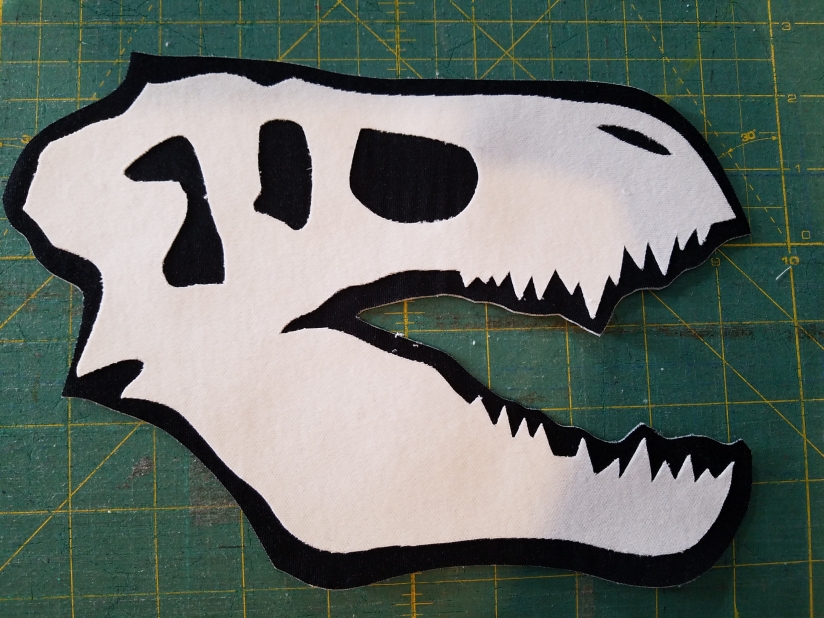
Now you can decide on where you would like to place your applique onto your blanket. Once you have decided, remove the paper backing and iron into place. Now you will move to your sewing machine and stitch into place. I stitch the outer applique along with the inner one. I also love to use contrasting thread when appliqueing. I feel it gives a more defined look!

Now that your applique is all stitched nicely into place, use a needle to move all thread to the back side of your top blanket and tie the ends so they don’t become unraveled.
You are now onto your final steps! I did not take a picture, I forgot…. But, your next step is to place your minky top and minky bottom blankets right sides together. It works best to lay this on a large surface. Somewhere where you have room to freely move around the blanket and smooth out any ruffles. My best advice is to make sure that your two minky pieces are EXACTLY the same size! Now you PIN, PIN, PIN! Use a sewing machine and sew around all four sides. I use a 1/4 inch seam allowance for this. Make sure to leave a small opening for turning the blanket right sides out. Once you have sewn all seams together, clip your corners. I do this by using my Great Grandma’s Pinking Shears!


Once your corners have been clipped, you will now turn your blanket right sides out. I find the easiest and less bulkiest way to do this, is to slide your fingers through the whole and grab the corner furthest from you. Now gently pull the blanket through your small opening.


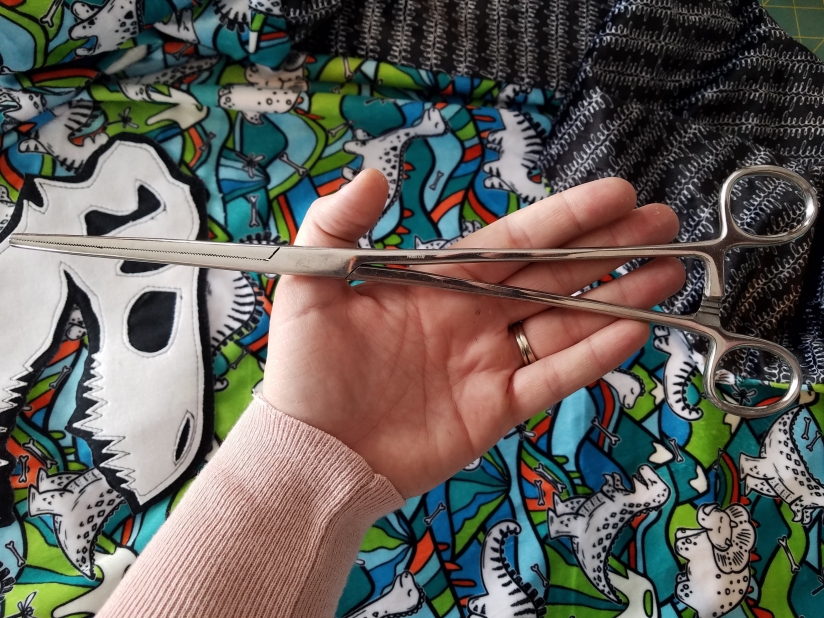
To pop your corners out for a nice square look, I use my Hemostat. One of the most handiest tools I own!
To close the opening where I turned my blanket right sides out, I used a hidden blanket stitch. It’s super fast and easy and looks invisible!

At this point, You could call it good! You could leave your new minky blanket just the way it is or add some top stitching. I decided to use my coverstitch to give my blanket a little extra. Plus I just love my coverstich!


I hope this little minky tutorial was helpful! Let me know what you think! Remember, minky isn’t scary, Just take your time!!!
4 comments
I’ve been wondering the best way to close the opening so I’m glad I found this blog!
I’ve always wondered how to do an appliqué by hand and how to use a minky blanket topper
I live the feel of mainly but HATE sewing it! PIN PIN PIN!!!! all the way around, pin like ur life depends on it! Love this reminder and the applique tutorial!
I should’ve read this before I made all my Christmas blankets! 😫 I struggle so much with minky, and one piece always ends up longer than the other. I pin and pin, but maybe not enough. 🤷🏼♀️